Saturday, May 28, 2011

My First Summer Project!


Let me begin my expressing my deep love for Hobby Lobby... I've pretty much lived within walking distance of that store since I was in 8th grade so that is my go-to craft store. I was in there the other day looking for a diploma frame (Yes, it's official, I have my Master's now!) and I happened upon these adorable little black buckets. I'd seen them before and actually have some small colorful ones from Target's dollar section, but I loved the look of the black ones. Even better... They marked for clearance 50% off! Then, I got inspired...


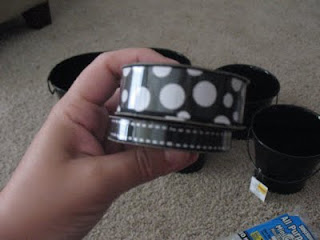
Cute Ribbon + Hot Glue = Instantly Cute Buckets!


I tested out the long one and it's just the perfect size to store pocket folders. I bought two medium and one small for Sharpies, pens, and other desk accessories.


But, WAIT! There's MORE!


If you've looked at my classroom photos you might have picked up on the fact that I'm a pretty big K-State fan and I'm NOT afraid to show that in my classroom. (I had a class full KU fans this past year. I kept telling them they were bullying me!) I realized that a few years ago I'd purchased some super cute K-State ribbon that was purple, black, and white and would look adorable on these buckets. Unfortunately, the K-State ribbon is in storage at school and the kind Hobby Lobby had in stock was not near as cute as what I already had. Rolls of ribbon were on sale for half price, though, so I decided to go on and pick up a few cute coordinating rolls so that I'm all prepared for my project when I get my other roll at school. I'm excited to share my final project once it's done.

Don't you love the polka dots?!? They coordinate with my curtains I made to cover up all the junk on my shelves. I'm also a huge fan of CTP's Poppin' Patterns collection so it ties into some of those items as well. I'm all about *trying* to make things in my classroom look cute and coordinated.


I'm tempted to get more of these buckets while they're still in stock and decorate them all cute to give as gifts. Remember my cute teacher appreciation gift? Yeah...


Friday, May 27, 2011

I Think I'm in Love...

Now now, don't get too excited. I'm not in love like THAT! (I wish...)

I'd been browsing other blogs and Teachers Pay Teachers and kept seeing really cute graphics and fonts . I'm already a big fan of the free fonts over on Kevin & Amanda's page and knew that what I was seeing wasn't from there. So, I did some creative investigating and found my way over to Lettering Delights! WOW!

If you haven't visited Lettering Delights yet, you need to. I'm big on free stuff, but I will drop some money when I think something is a good deal. I spent a grand total of $5, managed to get a bunch of freebies for joining, AND a great bundle of alphabets thanks to their $5 off discount right now.

I'm very excited to start making new things with my new fonts and alphabets. I know myself all too well and know that I'm going to go overboard and remake ALL of the sign and things for my classroom so that they're all cutesy and match! :)

Okay, it's a little late... Mother's Day Project

Things have been kind of crazy with school lately and so blogging was put on the back burner until summer.... Thankfully, SUMMER VACATION IS HERE!

Anyway, I'm getting caught up on a few posts I was meaning to share.

This was our Mother's Day project for the year. It's a picture tile. Total cost for me: 9 cents per student. (I had all supplies except the tiles on hand already!)

I can never settle on what to do for Mother's Day and I honestly forget about that holiday until usually a few days before. I've had years over being an over-achiever (Mother's Day cookbook = hours and hours of work on my part = very happy moms) to under-achiever (poems on construction paper made on Friday afternoon.)

I actually "borrowed" this idea from my aunt who is a first grade teacher in my building.

Here's what you need:


  1. Plain white paper and a color printer

  2. Plain 4x4 white tiles (I got mine at Menards on sale for 9 cents each.)

  3. Mod Podge

  4. Foam brush

  5. Craft Bond stick glue

  6. Digital camera

  7. Paper cutter

I had the students select a place and a pose out on the playground. The kids got pretty creative with how they wanted their pictures and I *tried* to make them look somewhat artsy.


I printed the pictures on regular paper on my inkjet printer. I just printed them as regular 4x6 photos and then cropped them down to about 3 1/2 x 3 1/2 with my paper cutter. (Some pics I adjusted my cropping to make them look better.)

Now, here's where I messed up and learned a lesson the hard way. Wait to let the pictures REALLY dry before gluing and applying the Mod Podge. (Had I not been in such a hurry doing this project on Friday morning I may not have had problems with pictures bubbling and curling a bit.) I had the kids help me with gluing the pictures down and rubbing them flat.

With the foam brush, apply a thin layer of Mod Podge over the picture. It's best to use a wide brush so that you can apply a layer in just 2 or 3 strokes. I went over all of the tiles once, let them dry about 15 minutes and then applied another layer. I repeated this about 3 times until they all had a nice glossy finish.

Mod Podge dries pretty fast, so we worked on the project in the morning, let them dry during specials and lunch, and then were able to wrap them up right after lunch. I had the kids create a card and let them decorate a white sack. We wrapped the tiles in pretty Dollar Tree tissue paper.

Friday, May 6, 2011

Teacher Appreciation

I had to share this cute idea for for a teacher appreciation gift. I've been seeing a lot of other bloggers post ideas online this week and it's given me a lot of neat ideas for ANYtime gifts!

I received this the other day from one of my students. It's simply a small metal bucket (I have several from Hobby Lobby and the dollar section at Target), two flowers cut out of scrapbooking paper, a flower clip, and some candy! Clipped to the flower was a Target gift card, too! (They know me so well!) I think I'm going to steal this idea for some of my end of the year gifts that I will be giving to paras and a few other staff members that have helped me out this year.

Other than the gift card part of this, the whole thing would only cost about $3-4 max to assemble. Of course it's nothing super fancy, but it's a thoughtful and cute gift idea. There are a lot of ways that you could vary this idea for whatever, but this was different than other teacher appreciation gifts I've received in the past.